3 More Stretches to Get and Keep You Out of Back Pain
As we discussed in the previous blog on back pain, back pain is the most common complaint when it comes to physical pain. The challenging part is figuring out what’s causing it. Assuming that you haven’t taken a hard fall, or other impact like a collision in football, hockey, or rugby, then chances are it’s coming from 2 possible sources.
One important consideration is whether or not your core strength is up to par. Meaning, is your core strong enough to get you through the day without your lower back jumping in to assist in movements that it’s not meant to do. It’s easy for the lower back and hips to become “irritated” when performing movements that say, the glutes, and/or core musculature should be doing. As in other areas of life, using the wrong tool for the job, can in fact make things worse.
Remember, getting out of pain is often a two-step process. One of the issues is that you’re going to need to strength some muscles. Two, you’re going to need to stretch the muscles that are either overworking or becoming overwhelmed. In either case of overworked or overwhelmed, the result is often the same, tight muscles that are restricting movement and most likely causing pain or discomfort.
Let me share 3 more hip and back stretches that will get and keep you out of pain
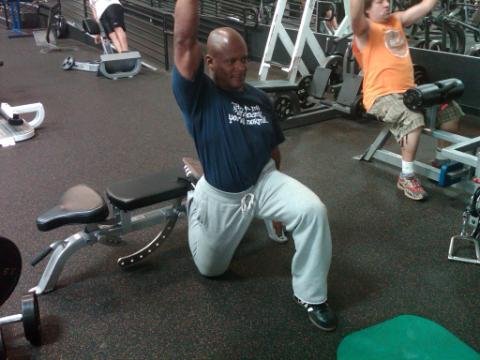
This is Stretch #1.
With your calves against the supporting surface take a medium to large step forward. Place one foot, shoe strings down, on the stable support surface behind you. Kneeling down bring the back leg knee to the floor. Now if you're just beginning you may need to place a pillow under your knee for cushion and to decrease the intensity of the stretch. Be sure that the front leg knee is bent at a 90 degree angle and the shin is perpendicular to the floor.
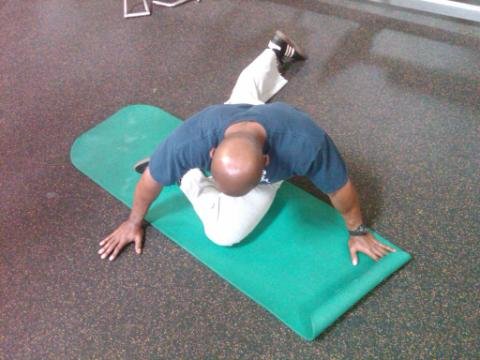
This is Stretch #2
Position your body with your right leg bent at a 45 degree angle. Straighten your back leg with the toe facing the floor. Position your upper body so that your knee is in line with your sternum (chest bone). Hips should be parallel to the floor. You should feel no pain in the knee. If you do stop immediately. This pose is also know as Pigeon. Hold position for 7 breaths.
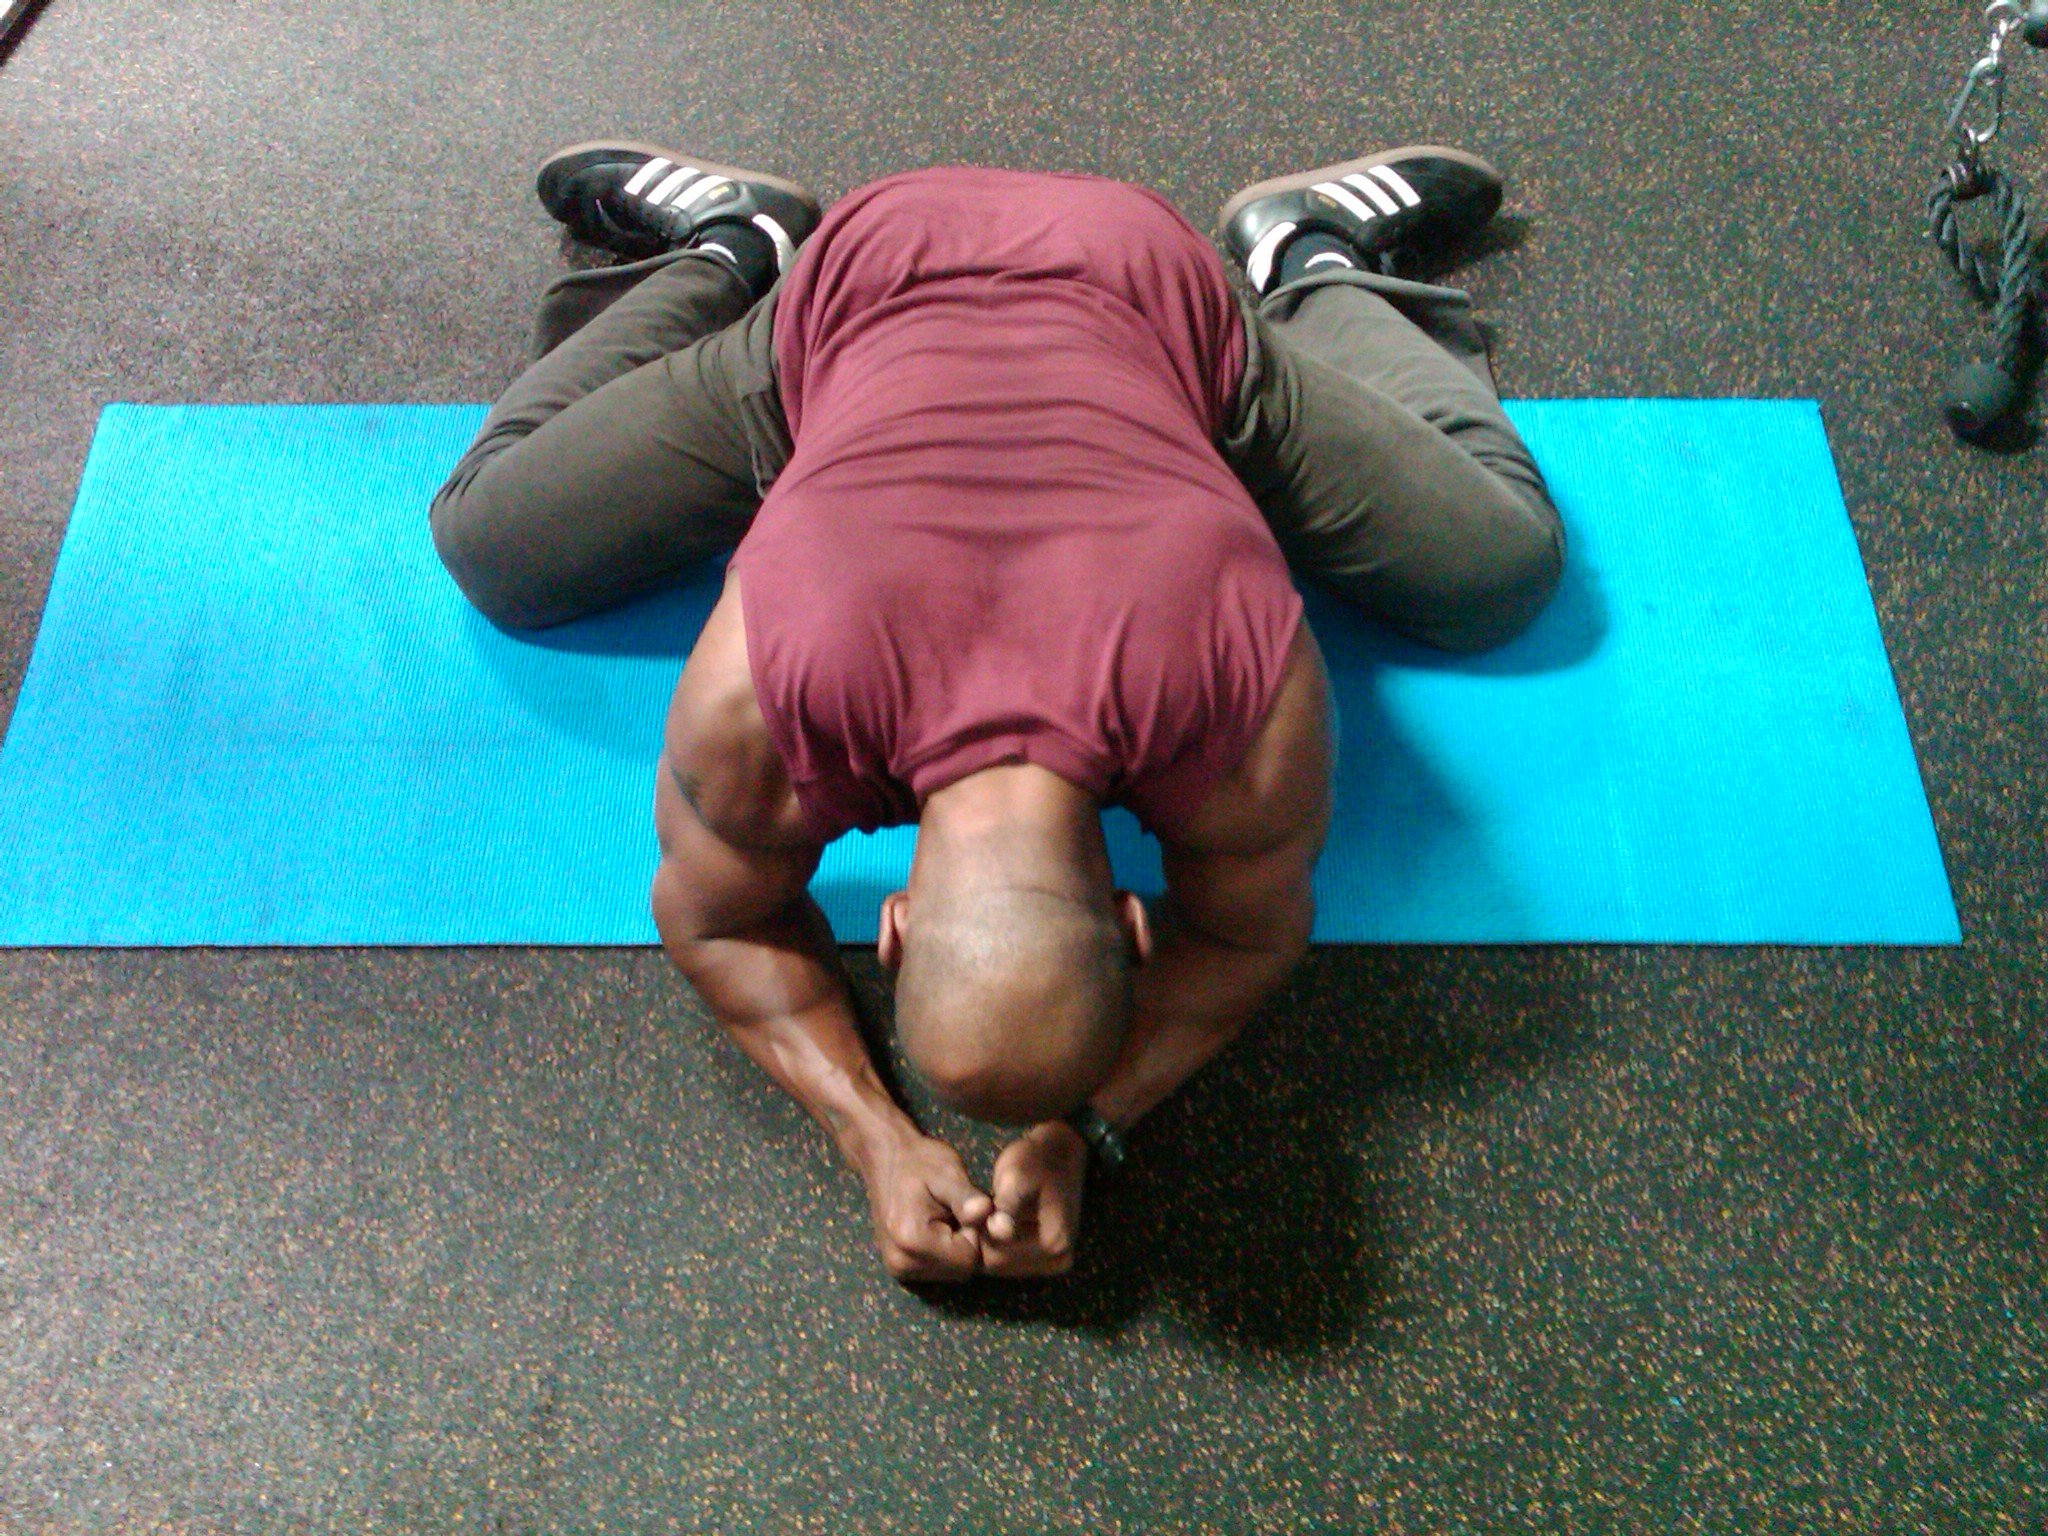
This is Stretch #3
Resting on knees and forearms, spread your knees as far apart as you can, comfortably. You should feel a stretch, but it should not be painful, about a 5 or 6 on a scale of 10. Next, you will slowly rock your body back towards your shoes, and then forwards towards your hands. Using your waistband as a guide, you should rock your waistband as far behind your knees as you do ahead of your knees. Rock back and forth 7-10 times. If the rocking is too much, just hold the position for 7 breaths.
Now you have 3 more stretches to add your collection to help keep you pain free and feeling good. Check back next week and I’ll be sure to share 3 more stretches to get and keep you out of back pain.
The 5 Most Important Stretches If You Spend Your Day Sitting
If you spend your day at a desk? This article provides essential stretches to help you get out of pain and discomfort.
Ski Season Ready 2?
This month I want to make sure to have those of you who enjoy winter sports activities like skiing,
snowboarding and ice skating to be prepared to enjoy your season. I can't tell you how many times I watch "regular" members come in on crutches after a weekend away of enjoying their sport. If it's something you truly enjoy, then let's make sure you can do and not get injured. The whole idea of working out and keeping healthy is so you can participate and enjoy the activities that make the daily grind all worth it -- right?
Well, last week I shared with you the first part of an effective warm-up -- self-massage. We all know you cannot effectively stretch a cold rubber band fresh out of the refrigerator (which would represent your muscles). You have to first warm it up properly, before engaging in stretching. That way you can avoid injuring yourself during stretching, and definitely decrease the chances of injury while engaged in your favorite activity.
This week I want to share with you the second part of an effective warm up -- stretching. I want you to do this after you have completed the self-massage.
When considering winter sports we want to be sure we have your body ready to handle the pounding of the slopes. Balance is a big factor considering the instability of ice and snow. So ankle, knee, and hip flexibility and stability are very important. We want to prepare your entire body, for sure, but we will give extra attention to the lower body because you will be using it so much more.
Since we all know time is of the essence please find below the stretches I've found most important in preparing for a safe and fun winter season of activities on the slopes or ice.
Be sure to check back next week as I will share with you the important exercises that will get your body strong and help you avoid injury.
This is Stretch#1 (1/3).
This stretch is often called Child's Pose. From a kneeling position, toes pointed straight back, sit backwards so that you are sitting on the heels of your shoes. Reach forward with both arms, far enough to feel a stretch in the lower back and shoulders. Hold for 7-10 seconds
This is Stretch #1 (2/3)
Keeping your legs where they are at, engage your abs and move both arms to the right until a stretch is felt on the left side of the body. Think of making your body into a half circle. Be sure to remain seated on your heels. Hold for 7-10 seconds.
This is Stretch #1 (3/3).
Now do the same process you did for the above picture for the left side. Hold for 7-10 seconds
This is Stretch #2
From a seated position place your hands behind you, approximately shoulder width, with your fingers pointing away from your body. Slowly slide your body forward, away from your hands, until a stretch is felt. Be sure to keep your chest up and gently squeeze your shoulder blades together as you lift your chest. Hold this position for 7-10 seconds. Repeat 2-3 times.
This is Stretch#3.
(face down image) Position your body with your right leg bent at a 45 degree angle. Straighten your back leg with the toe facing the floor. Position your upper body so that your knee is in line with your sternum (chest bone). Hips should be parallel to the floor. You should feel no pain in the knee. If you do stop immediately. This pose is also know as Pigeon. Hold position for 7 breaths.
(face up image) This is a slightly less aggressive form of pigeon from the lying position. Lay flat on your back. Bring your right leg towards your chest. Grasping your knee and ankle gently, pulling the leg towards the left side of your chest (so you are moving the leg across the body) until you feel a stretch in your glutes. You will create a very gentle stretch in the hip. You should feel no pain in the knee. Repeat this process 3-7 times on both sides.
This is Stretch #4
Begin on your knees, with your knees out wide, resting on forearms. Then straighten one leg out to the side. Be sure that the toe of the straight leg is in line with the knee of the kneeling leg. If possible, reach out to touch toe of straight leg with same side hand. Repeat movement 3 times on both sides.
This is Stretch #5.
I call this Windshield Wipers. Lay flat on your back, arms out wide, knees bent 45-90 degrees, feet flat on the ground. Take your left ankle and place it on your right knee. Drop both legs to the left side to feel a stretch in the right hip. The goal is for the stretch to come from the hip and NOT the lower back. Hold for 5-7 breaths. Repeat on other side.
This is Stretch #6.
With your calves against the supporting surface take a medium to large step forward. Place one foot, shoe strings down, on the stable support surface behind you. Kneeling down bring the back leg knee to the floor. Now if you're just beginning you may need to place a pillow under your knee for cushion and to decrease the intensity of the stretch. Be sure that the front leg knee is bent at a 90 degree angle and the shin is perpendicular to the floor.
7 Most Important Stretches If You Spend Your Day At A Desk
After last Friday's post I received quite a few emails regarding which were the most important stretches. "I don't have time to do them all Kurt, c'mon." So I thought it might be a good idea if I broke the stretches down into groups so that you can use them more effectively.
By and large most of my clientele spend the majority of their day sitting at a desk. They tell me that they have few if any opportunities to get up from their desk for any length of time. And if they do, it's usually to go to a meeting where they spend anywhere from 2-4hrs sitting again.
As all of you know, who have been following my posts, sitting for long periods of time has significant consequences to your body. Especially your lower back, knees and sometimes wrists (depending how much time you spend on the computer). So let's get rid of that pain and discomfort.
Below I have listed the 7 most important stretches if you're a person who is stuck at a desk for most of the day.
I would encourage you to do these stretches a minimum of 1x/day. They will take you approximately 15-30 minutes to do. Not much time to invest to get out of pain. Think about it for a second. You spend 4-8 hours sitting. I'm just asking for 30 minutes a day to get you out of pain, and help you decrease your stress level. Sounds like a good investment to me.
This is Stretch#1.
Position your body with your right leg bent at a 45 degree angle. Straighten your back leg with the toe facing the floor. Position your upper body so that your knee is in line with your sternum (chest bone). Hips should be parallel to the floor. You should feel no pain in the knee. If you do stop immediately. This pose is also know as Pigeon.
Hold position for 7 breaths.
This is Stretch #2.
Begin on your knees, with your knees out wide, resting on forearms. Then straighten one leg out to the side. Be sure that the toe of the straight leg is in line with the knee of the kneeling leg. If possible, reach out to touch toe of straight leg with same side hand.
Repeat movement 3 times on both sides.
This is Stretch #3.
With your calves against the supporting surface take a medium to large step forward. Place one foot, shoe strings down, on the stable support surface behind you. Kneeling down bring the back leg knee to the floor. Now if you're just beginning you may need to place a pillow under your knee for cushion and to decrease the intensity of the stretch. Be sure that the front leg knee is bent at a 90 degree angle and the shin is perpendicular to the floor.
Hold for 5-7 breaths. Repeat on other side.
This is Stretch#4.
Begin with your head, forearms, shoulder blades, and butt against the wall. Feet should be 6-8" away from wall. Make sure there is minimal space between your lower back and wall.
Ending position for Stretch #4.
Extend your arms up and out into a 'Y' position. Be sure to keep forearms and hands in contact with the wall at all times.
Repeat movement 7-10 times.
This is Stretch #5.
Taking a lunge position halfway through a doorway, use this inverted 'V', place your hands on a door frame and gently lean forward until a stretch is felt in the shoulder, chest and/or arms. Make sure your weight is evenly balanced between the front and back leg.
Hold this position for 5-7 seconds. Repeat 2-3 times.
This is Stretch #6.
Stand straight and clasp your hands behind your back.
Ending position Stretch #6.
Tuck hips underneath you (by flexing your butt) and tighten your stomach, move clasped hands towards floor, while pulling shoulders back and lifting chest. This should create erect posture. Be sure not to arch lower back.
Hold for 5-7 breaths. Repeat 3-5 times.
This is Stretch#7 (1/3).
This stretch is often called Child's Pose. From a kneeling position, toes pointed straight back, sit backwards so that you are sitting on the heels of your shoes. Reach forward with both arms, far enough to feel a stretch in the lower back and shoulders.
Hold for 7-10 seconds
Stretch #7 (2/3)
Keeping your legs where they are at, engage your abs and move both arms to the right until a stretch is felt on the left side of the body. Think of making your body into a half circle. Be sure to remain seated on your heels.
Hold for 7-10 seconds.
Stretch #7 (3/3).
Now do the same process you did for the above picture for the left side.
Hold for 7-10 seconds.
Well, there you go. The 7 most important stretches for those of you who spend way too many hours seated at your desk. These quick 7 should get you out pain and help you stay that way.
As always let me know what you think.


